Tutorial – Step 2
Creating the Structural Model
A structural model is a mathematical idealization of a real structure. The model is a tool to help us predict how the real structure will behave when it is loaded.
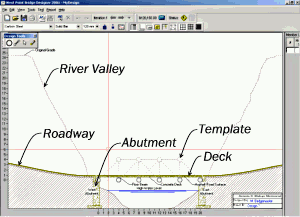
 Before we begin the truss design, let’s take a moment to familiarize with the Drawing Board–the screen area on which we will create, test, and optimize our structural model. Note that the screen already shows the river valley, roadway, abutments, and bridge deck, as well as our Howe Through Truss template, which is outlined in light gray dotted lines.
At the left and bottom edges of the Drawing Board are rulers, which show the dimensions of the project site in meters. Above the Drawing Board are several toolbars, and to the right is a list of the steel truss members in our structural model. The list is blank, of course, because we haven’t created any members yet.
We’ll begin the structural model by drawing joints–the points at which our truss members will be connected together.
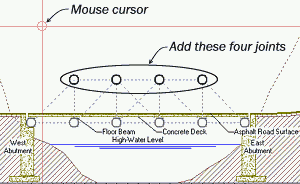
 Note that six joints have already been created automatically. These six joints, which cannot be deleted or moved, represent the connecting points between the concrete bridge deck and the steel structure.
There are only four more joints to add. Their locations are indicated with dotted circles on the template. To draw these joints, move the mouse cursor (indicated by two perpendicular red lines) directly over each of the dotted circles and click the left mouse button. After four clicks, the result should look like the picture at right.
If you accidentally draw a joint in the wrong place, just click the Undo button on the WPBD toolbar.
Now we’re ready to draw the steel structural members that will form our truss. From the Design Tools palette in the upper left-hand corner of the Drawing Board, select the Member tool, as shown at right. The mouse cursor will change to a pencil.
Members are drawn from joint to joint, and the dotted lines of the template show us which joints to use as the endpoints for each member.
To begin, move the cursor over any joint and press the left mouse button. While holding this button down, drag the mouse to an adjacent joint, using the template as a guide. When the cursor reaches the second joint, release the mouse button, and a dark gray member will be drawn between the two joints. Use this procedure to draw all 18 members that make up the Howe Through Truss. The result should look like the picture at right.
Our structural model is complete! Though it might seem that all we’ve done is to draw a picture of a truss, we have actually completed a preliminary design of its engineering properties as well. You’ve probably already noticed that, on the lower toolbar, there are three drop-down lists, which currently read Carbon Steel, Solid Bar, and 120 mm.
These are the Member Properties lists.
The three lists are used to define the material, cross-section, and size of structural members. The values displayed in these lists are automatically assigned to all newly created members. Thus all 18 members in our structural model are 120 millimeter solid bars made of carbon steel.
Are these members strong enough to carry the highway loads that our bridge will be subjected to? The only way to find out is to test our design.
